Have you ever made your own paper? Using paper can’t get much more environmentally friendly than this. Plus, it’s really fun too! Take your Homemade Holiday Mission to the next level by getting your family together and use these instructions to make your own paper for your Homemade Holiday cards!
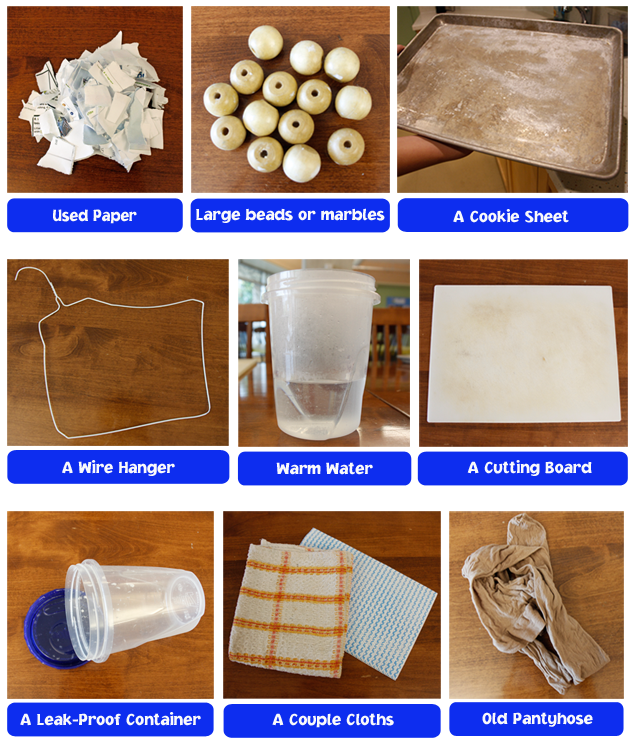
Here’s What You’ll Need

Special Notes:
– Used paper can include old paper, newspaper, used envelopes, even junk mail (just make sure the paper isn’t glossy).
– Use the cookies sheet to catch water and the cutting board for flattening.
– When looking for a cloth, make sure it isn’t a face cloth or bath towel as a textured material will stick to your paper.
– You can substitute any of these items if you come across something that you think would work better.
What to do…

Rip up your paper into small pieces. Put the pieces into your leak-proof plastic container with just enough warm water to cover all the pieces and let it soak for about 30 minutes.
TIP: Add some glitter to the mix if you want your paper to sparkle!

While you are waiting for your paper pieces to soak, it’s the perfect time to make your screen. Have an adult bend your wire hanger into a rectangle. Next stretch the old pantyhose over the wire frame.
TIP: You can use duct tape to secure the edges if needed.
Are the 30 minutes up? Great! Add a little bit more warm water to your container, toss in your marbles and close it tightly. The amount water you use depends on how many paper pieces you have and how thin you want your finished paper to be. You may need to do a little experimenting. With the help of an adult shake the container until the paper has broken down and the mixture has thickened. Once you’ve removed your marbles, your paper pulp is ready!

TIP: Want a faster way to make the paper pulp? Instead of using marbles and a container, put the soaked paper pieces and water into a kitchen blender! Always remember to ask an adult before using kitchen appliances.

Place your homemade screen over the cookie sheet and pour your paper pulp over the screen until it is covered evenly. Don’t worry if you have extra pulp, it means you can make another sheet!
TIP: If your pulp is too thick, put it back in the container, add more water and mix again.

Put a clean cloth over the pulp and place your cutting board on top. Now squeeze the cutting board and cookie sheet together as hard as you can. This will help you get rid of some of the extra water while flattening your paper at the same time. Drain the extra water. Remove the cutting board and press your sponge on the cloth to soak up more water. Absorb as much water as you can. The more water you absorb, the faster your paper will dry.

Flip your screen over so the cloth is facing downward and gently scratch the screen with your finger nails or the tip of a spoon. This will help the paper detach from the screen.
TIP: Feel free to replace your cloth before flipping the screen if you think it is too wet.

Carefully remove your screen and set your paper and cloth aside to dry. Once it’s completely dry, carefully peal off your paper. If you notice your paper isn’t as flat as you want it, put it between two books for a while.
When your paper is flattened to your liking, you have made your own paper!
Want to make something fun with your homemade paper? Accept your Homemade Holiday Mission to make homemade holiday cards out of materials from around your house.

I think I am going to try it
cool
i might but i am not so sure hopefully i can ;]
I should try it!
I am going to ask my Mom.
I had no idea that making paper was so simple! I am going to start making my own paper a lot more.
This is very cool and everyone should do it..
That is so cool.
We have been wanting to make paper for a while now! Thanks for telling us how to do it!
it is soooooooo hard!
It is hard the first few times but you will start to get a hang of it after a while! 🙂
so cool
I remember doing this in kinder garden. it was SOOO Fun and easy
thats really amazing! never thought u could make paper like that!